搭建速度控制系统
设计一个通过按钮来改变车辆速度的巡航控制系统。
课程计划
课前准备
- 通读教师教学材料。
- 可根据教学需要使用 EV3 Lab 软件或编程 App 应用程序中的入门教学材料来设计课程。这将有助于学生熟悉乐高教育® MINDSTORMS® 头脑风暴 EV3 机器人套装。
参与(30 分钟)
- 结合下文“发起一次讨论”部分的提示,组织学生围绕本项目展开讨论。
- 解释项目。
- 将整个班级按两人一组方式进行分组。
- 为学生预留头脑风暴的时间。
探究(30 分钟)
- 让学生创建多个原型。
- 鼓励学生探索搭建和编程。
- 让每组学生搭建并测试两种方案。
解释(60 分钟)
- 要求学生测试自己的方案,并选出最优的一个。
- 确保学生能够创建自己的测试表。
- 为每个团队留些时间来完成项目,并收集他们的工作记录材料。
拓展(60 分钟)
- 给学生一些时间,让他们完成自己的最终报告。
- 组织一次分享会,让每个团队展示他们的成果。
评估
- 为每位学生的课堂表现提供反馈。
- 可借助所提供的评价量表来简化此环节。
发起一次讨论
私家车上的巡航控制功能是一种自动控制车辆速度的系统。尽管该系统貌似现代技术,但实际上它早在 1958 年就被首次引入。那它的工作原理是什么呢?
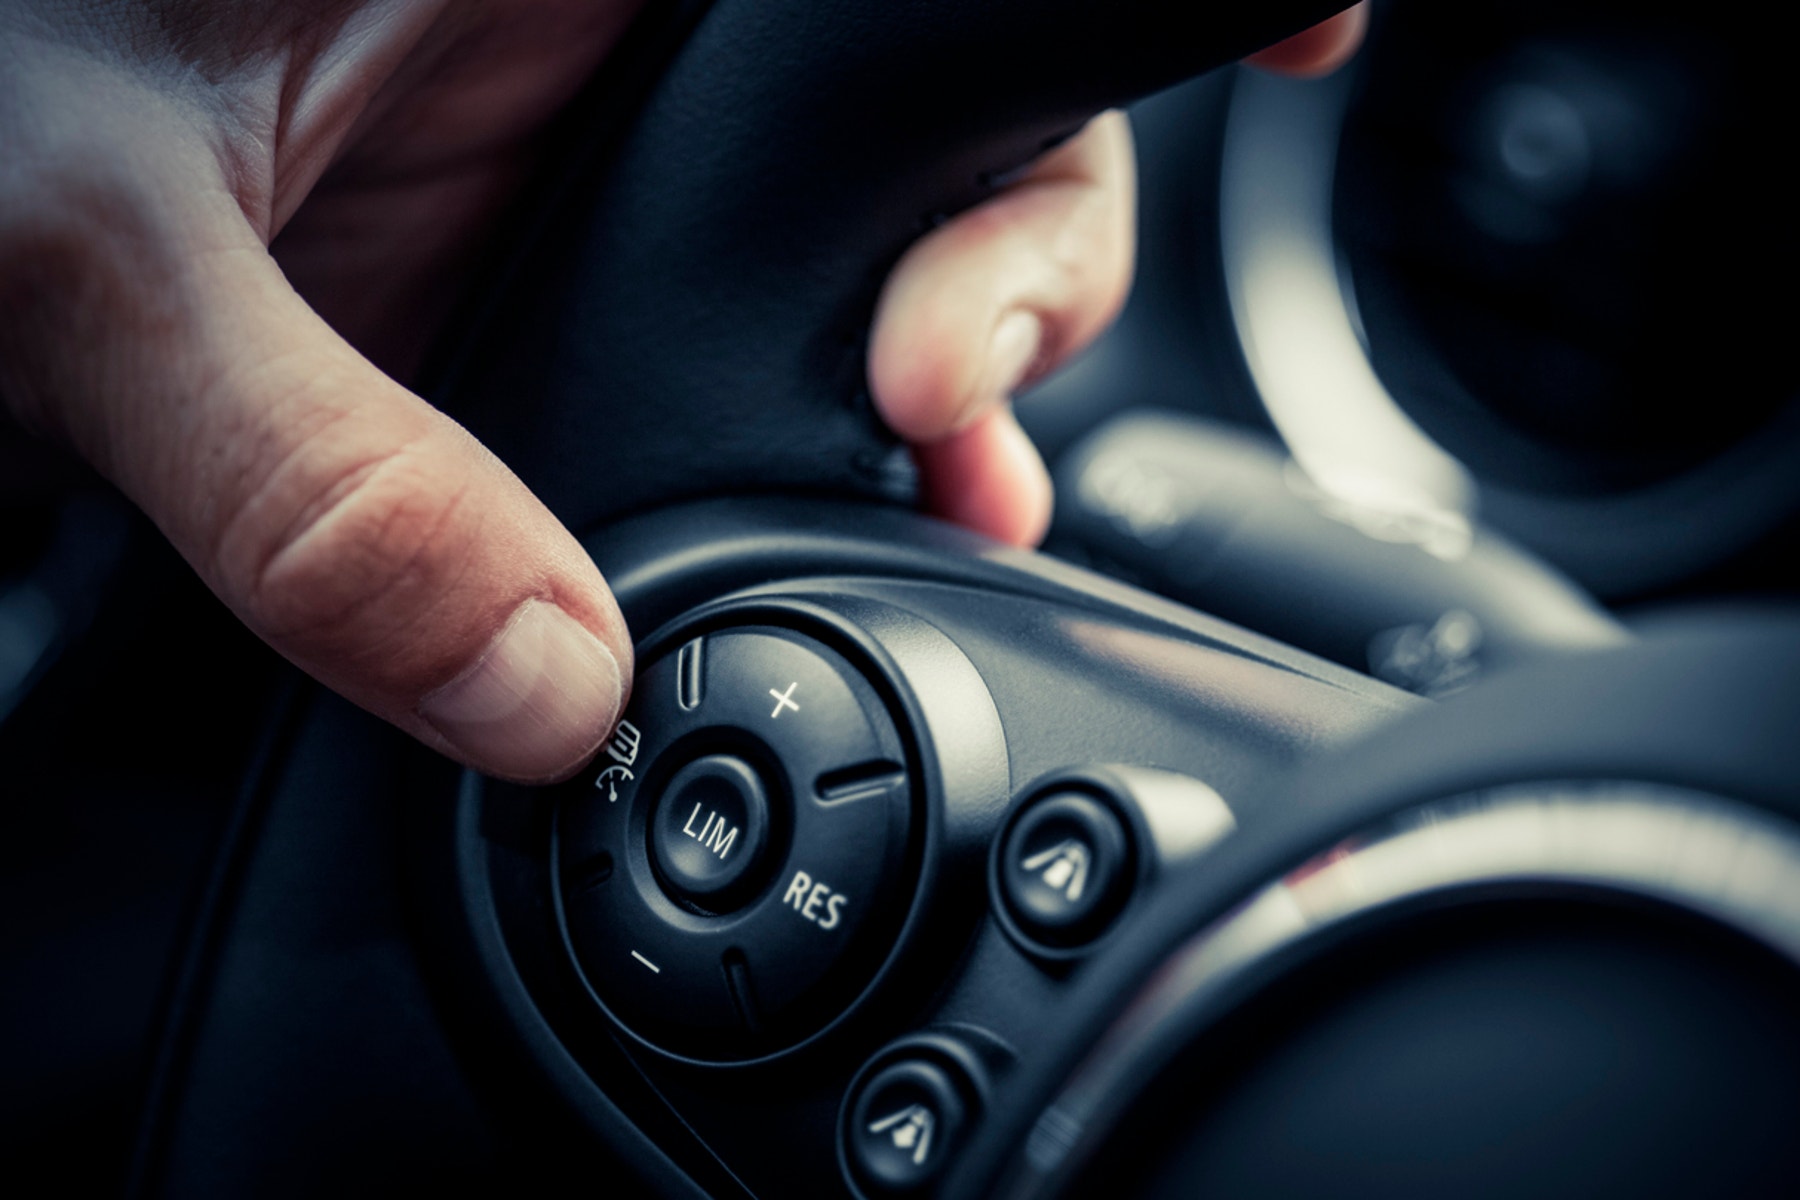
引入头脑风暴环节。
要求学生思考下列问题:
- 对汽车巡航控制的目的是什么?
- 在长时间驾驶过程中,巡航控制如何帮助驾驶员?
- 怎样优化巡航控制?
- 驾驶员如何使用按钮式速度控制系统?
- 为了将按钮按压动作转变为电机转速变化,需要在程序中引入哪些元素?
给学生留出回答问题的时间:
鼓励学生记录最初想法,并且解释第一原型选用此方案的原因。要求学生描述:如何在整个项目进行过程中评估自己的想法。通过这种方式,他们在审核和修改过程中将会拥有评估自身方案的具体信息,并可籍此来决定方案是否有效。
搭建要诀
从搭建车辆开始。学生可以使用任何建议的乐高®教育 MINDSTORMS® 头脑风暴 EV3 机器人驱动模块模型,或者设计自己的模型。确保他们包含能够模拟汽车(具有巡航控制功能)方向盘上按钮功能的按钮。
使用两个触动传感器
向学生讲解:在今天的课程中,他们将使用两个触动传感器来控制并保持自己驱动模块模型的速度。
编程要诀
学生很可能会在此项目中使用“变量模块”。“变量模块”是一种可以存储数据(即文本、逻辑、数字或数组)的编程模块,而这些数据在程序运行过程中可随时被覆盖。
变量是一种在程序中存储可更新值的方式。只要程序处于运行状态,就可以反复覆盖存储在变量中的值。
使用变量程序来增加速度
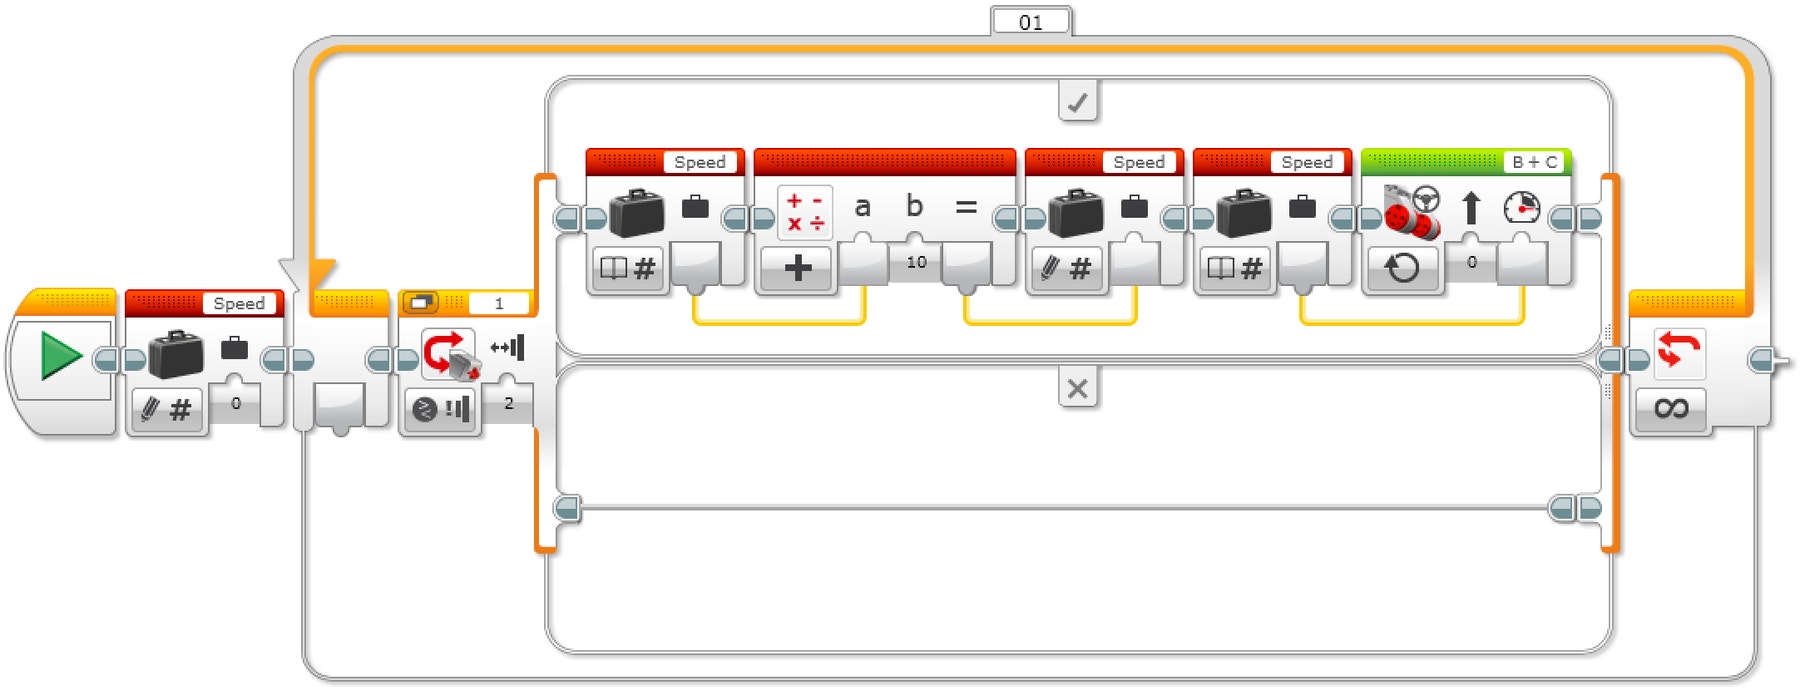
程序说明
1.启动此程序。
2.创建一个名为 “Speed” 的变量模块,并输入值 0。
3.如果触动传感器被按压:
a.读取名为 “Speed” 的变量。
b.使读取值增加 10。
c.将结果写入名为 “Speed” 的变量。
d.读取名为 “Speed” 的变量。
e.以设定的速度(存储在变量 “Speed” 中的值)启动电机 B 和 C,否则(不执行任何操作)。
4.持续重复步骤 3a 到 3e。
使用变量来增加和降低速度
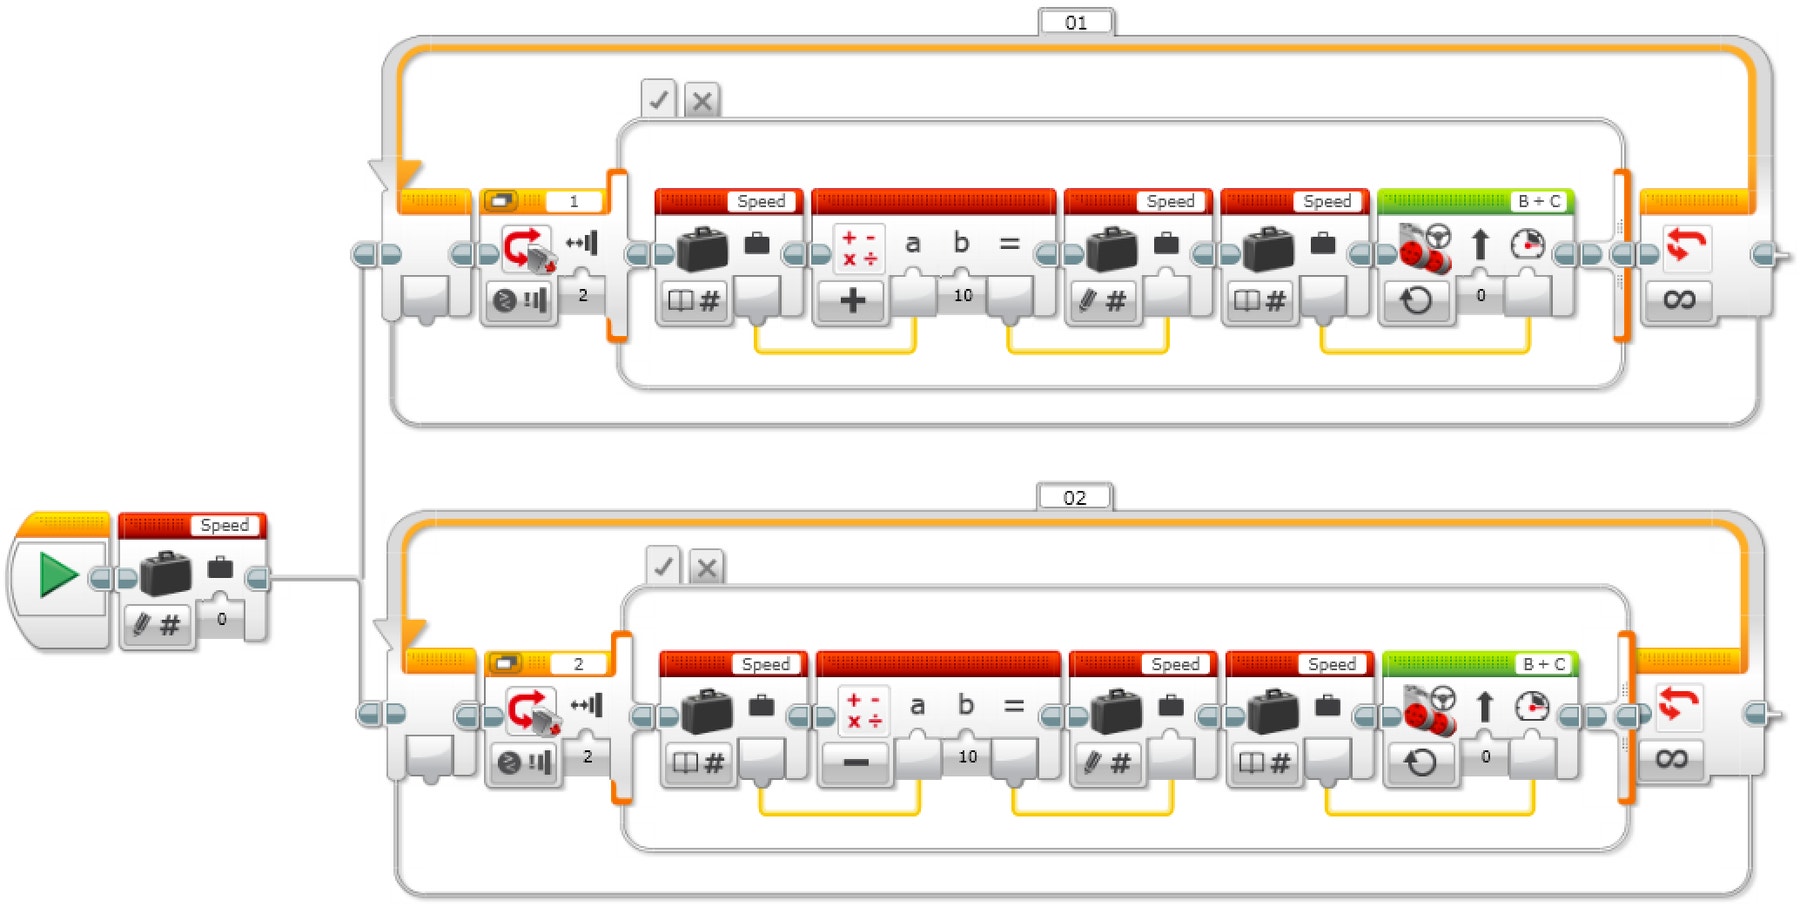
程序说明
1.启动此程序。
2.创建一个名为 “Speed” 的变量模块并输入值 0,然后启动两个任务。
任务 1
3.如果触动传感器 1 被按压:a.读取名为 “Speed” 的变量。
b.使读取值增加 10。
c.将结果写入名为 “Speed” 的变量。
d.读取名为 “Speed” 的变量。
e.以设定的速度(存储在变量 “Speed” 中的值)启动电机 B 和 C,否则(不执行任何操作)。
4.持续重复步骤 3a 到 3e。
任务 2
5.如果触动传感器 2 被按压:a.读取名为 “Speed” 的变量。
b.从读取值中减去 10。
c.将结果写入名为 “Speed” 的变量。
d.读取名为 “Speed” 的变量。
e.以设定的速度(存储在变量 “Speed” 中的值)启动电机 B 和 C,否则(不执行任何操作)。
6.持续重复步骤 5a 到 5e。
使用变量来提高和降低速度,并对他们进行显示
让学生使用“显示模块”来显示驱动模块的速度。
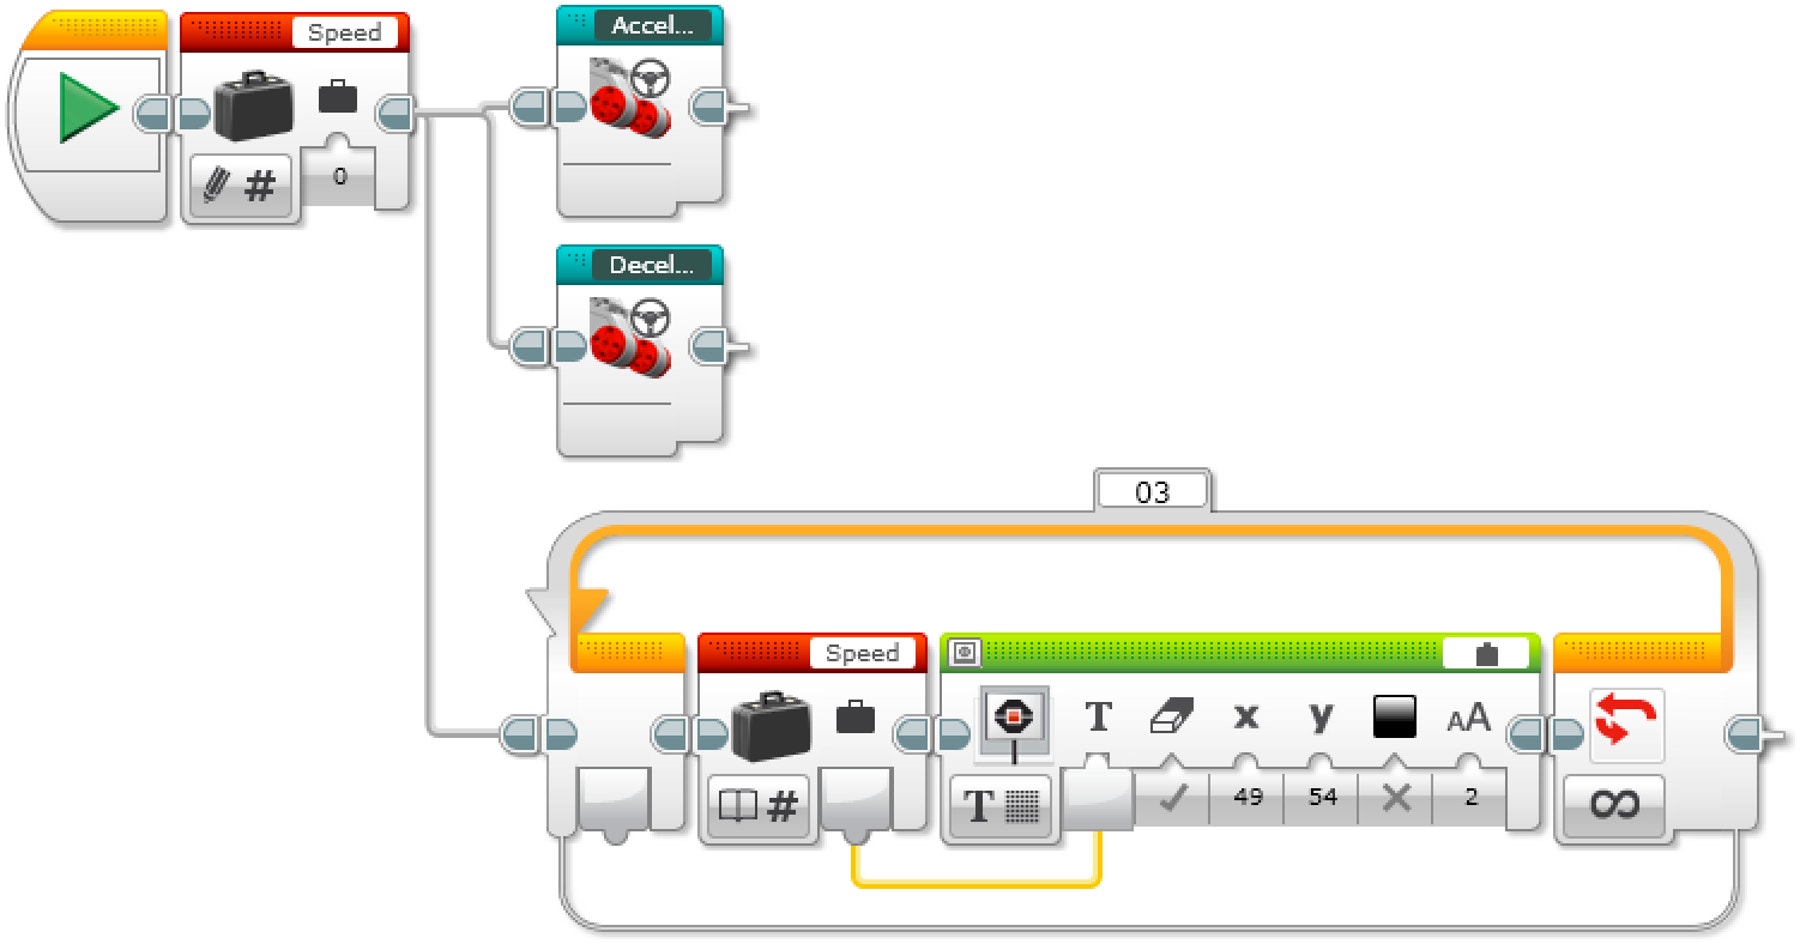
程序说明
1.启动此程序。
2.创建一个名为 “Speed” 的变量模块并输入值 0,然后启动三个任务。
任务 1
3.启动我的模块“加速”。
任务 2
4.启动我的模块“减速”。
任务 3
5.读取名为 “Speed” 的变量。
6.显示存储在名为 “Speed” 变量中的值。
7.持续重复步骤 5 和 6。
EV3 MicroPython 程序方案
使用变量增加速度
#!/usr/bin/env pybricks-micropython

from pybricks import ev3brick as brick
from pybricks.ev3devices import Motor, TouchSensor
from pybricks.parameters import Port, Stop, Button
from pybricks.tools import wait
from pybricks.robotics import DriveBase

# Configure 2 motors with default settings on Ports B and C.  These
# will be the left and right motors of the Driving Base.
left_motor = Motor(Port.B)
right_motor = Motor(Port.C)

# The wheel diameter of the Robot Educator Driving Base is 56 mm.
wheel_diameter = 56

# The axle track is the distance between the centers of each of the
# wheels.  This is 118 mm for the Robot Educator Driving Base.
axle_track = 118

# The Driving Base is comprised of 2 motors.  There is a wheel on each
# motor.  The wheel diameter and axle track values are used to make the
# motors move at the correct speed when you give a drive command.
robot = DriveBase(left_motor, right_motor, wheel_diameter, axle_track)

# Set up the Touch Sensor on Port 1.  It is used to increase the speed
# of the robot.
increase_touch_sensor = TouchSensor(Port.S1)

# Initialize the "old_speed" variable to "None."  It is used to check
# whether the speed variable has changed.  Setting it to "None" ensures
# this check will be "True" when the speed variable is initialized with
# a value.
old_speed = None

# Initialize the speed variable to 0.
speed = 0

# This is the main part of the program.  It is a loop that repeats
# endlessly.
while True:

    # Check whether the Touch Sensor is pressed, and increase the speed
    # variable by 10 mm per second if it is.
    if increase_touch_sensor.pressed():
        speed += 10

    # If the speed variable has changed, update the speed of the robot.
    if speed != old_speed:
        old_speed = speed
        robot.drive(speed, 0)

    # Wait 200 milliseconds before starting the loop again.
    wait(200)
使用变量来增加和降低速度
#!/usr/bin/env pybricks-micropython

from pybricks import ev3brick as brick
from pybricks.ev3devices import Motor, TouchSensor
from pybricks.parameters import Port, Stop, Button
from pybricks.tools import wait
from pybricks.robotics import DriveBase

# Configure 2 motors with default settings on Ports B and C.  These
# will be the left and right motors of the Driving Base.
left_motor = Motor(Port.B)
right_motor = Motor(Port.C)

# The wheel diameter of the Robot Educator Driving Base is 56 mm.
wheel_diameter = 56

# The axle track is the distance between the centers of each of the
# wheels.  This is 118 mm for the Robot Educator Driving Base.
axle_track = 118

# The Driving Base is comprised of 2 motors.  There is a wheel on each
# motor.  The wheel diameter and axle track values are used to make the
# motors move at the correct speed when you give a drive command.
robot = DriveBase(left_motor, right_motor, wheel_diameter, axle_track)

# Set up the Touch Sensor on Port 1.  It is used to increase the speed
# of the robot.
increase_touch_sensor = TouchSensor(Port.S1)

# Set up the Touch Sensor on Port 2.  It is used to decrease the speed
# of the robot.
decrease_touch_sensor = TouchSensor(Port.S2)

# Initialize the "old_speed" variable to "None."  It is used to check
# whether the speed variable has changed.  Setting it to "None" ensures
# this check will be "True" when the speed variable is initialized with
# a value.
old_speed = None

# Initialize the speed variable to 0.
speed = 0

# This is the main part of the program.  It is a loop that repeats
# endlessly.
#
# First, increase the speed variable if Touch Sensor 1 is pressed.
# Second, decrease the speed variable if Touch Sensor 2 is pressed.
# Finally, the robot updates its speed if the speed variable was
# changed.
#
# Then the loop starts over after a brief pause.
while True:

    # Check whether Touch Sensor 1 is pressed, and increase the speed
    # variable by 10 mm per second if it is.
    if increase_touch_sensor.pressed():
        speed += 10

    # Check whether Touch Sensor 2 is pressed, and decrease the speed
    # variable by 10 mm per second if it is.
    if decrease_touch_sensor.pressed():
        speed -= 10

    # If the speed variable has changed, update the speed of the robot.
    if speed != old_speed:
        old_speed = speed
        robot.drive(speed, 0)

    # Wait 200 milliseconds before starting the loop again.
    wait(200)
使用变量来提高和降低速度,并对他们进行显示
#!/usr/bin/env pybricks-micropython

from pybricks import ev3brick as brick
from pybricks.ev3devices import Motor, TouchSensor
from pybricks.parameters import Port, Stop, Button
from pybricks.tools import wait
from pybricks.robotics import DriveBase

# Configure 2 motors with default settings on Ports B and C.  These
# will be the left and right motors of the Driving Base.
left_motor = Motor(Port.B)
right_motor = Motor(Port.C)

# The wheel diameter of the Robot Educator Driving Base is 56 mm.
wheel_diameter = 56

# The axle track is the distance between the centers of each of the
# wheels.  This is 118 mm for the Robot Educator Driving Base.
axle_track = 118

# The Driving Base is comprised of 2 motors.  There is a wheel on each
# motor.  The wheel diameter and axle track values are used to make the
# motors move at the correct speed when you give a drive command.
robot = DriveBase(left_motor, right_motor, wheel_diameter, axle_track)

# Set up the Touch Sensor on Port 1.  It is used to increase the speed
# of the robot.
increase_touch_sensor = TouchSensor(Port.S1)

# Set up the Touch Sensor on Port 2.  It is used to decrease the speed
# of the robot.
decrease_touch_sensor = TouchSensor(Port.S2)

# Initialize the "old_speed" variable to "None."  It is used to check
# whether the speed variable has changed.  Setting it to "None" ensures
# this check will be "True" when the speed variable is initialized with
# a value.
old_speed = None

# Initialize the speed variable to 0.
speed = 0

# This is the main part of the program.  It is a loop that repeats
# endlessly.
#
# First, increase the speed variable if Touch Sensor 1 is pressed.
# Second, decrease the speed variable if Touch Sensor 2 is pressed.
# Finally, the robot updates its speed if the speed variable was
# changed, and displays it on the screen.
#
# Then the loop starts over after a brief pause.
while True:

    # Check whether Touch Sensor 1 is pressed, and increase the speed
    # variable by 10 mm per second if it is.
    if increase_touch_sensor.pressed():
        speed += 10

    # Check whether Touch Sensor 2 is pressed, and decrease the speed
    # variable by 10 mm per second if it is.
    if decrease_touch_sensor.pressed():
        speed -= 10

    # If the speed variable has changed, update the speed of the robot
    # and display the new speed in the center of the screen.
    if speed != old_speed:
        old_speed = speed
        robot.drive(speed, 0)
        brick.display.clear()
        brick.display.text(speed, (85, 70))

    # Wait 200 milliseconds before starting the loop again.
    wait(200)
拓展
语言艺术拓展
选项 1
为了引入语言艺术能力培养环节,让学生:
- 通过书面方式、草图和/或照片等方式,对设计过程进行总结,并制作一份最终报告。
- 制作一段演示设计过程的视频,从最初想法开始,到项目完成结束。
- 制作一份跟他们程序相关的演示文稿。
- 制作一份演示文稿,将他们的项目与类似系统的实际应用联系起来,并描述可以根据他们的创造而进行的新发明。
选项 2
在本节课中,学生将创建一个速度控制界面。个人和机构收集车速数据,以报告交通状况并减少交通事故。
为了引入语言艺术能力培养环节,让学生:
- 写一篇支持以下论点的议论文:个人或机构收集机动车车速数据来监控交通安全可有效降低机动车发生事故的频率
- 提出相反论点,即这种做法严重侵犯个人数据隐私,并使用具体的论据来分析对立论点的优缺点
数学拓展
在本节课中,学生将创建一个速度控制界面。人类驾驶员能够熟练地评估路况并相应地改变车速。然而,无人驾驶系统必须进行训练才能做到这一点。
为了提高数学技能并探索无人驾驶汽车所涉及的人工智能,请要求学生:
- 考虑应检查的不同变量,以确定路况与其对车辆操控和性能的影响之间的关系
- 从系列变量中选择三至四个变量引入路况数学模型,并创建一个数据表来组织这些变量与车辆的理想速度之间的关系
- 请注意,无人驾驶汽车使用机器学习流程来识别和更新路况变量与车速之间的关系,识别干、湿和积雪道路的路况变量,然后预测这些变量与安全行驶速度之间的关系(例如,干燥道路的变量可能是道路的粗糙度)
评估环节
教师观察清单
可根据教学需要设定等级,例如:
1.部分完成
2.全部完成
3.超额完成
请使用下列成功完成任务的标准来评估学生的进度:
- 学生能够识别问题的关键要素。
- 学生能够自主开发出可行且富有创意的方案。
- 学生能够清楚地交流他们的想法。
自我评估
当学生收集到所需的性能数据后,给他们一些时间反思自己的方案。 通过提出如下问题来帮助他们:
- 你们的方案是否符合“设计任务”的标准?
- 你们的机器人运动的能够更精准些吗?
- 其他人解决这个问题时采用了哪些方法?
要求学生进行头脑风暴,并记录两种能够改进他们方案的方法。
同伴反馈
推动学生进行同伴审核,由每个小组负责评价自己及其他小组的项目。此审核过程能够培养学生提供建设性反馈的能力,提升他们的分析能力和使用客观数据支持论点的能力。
职业连接
喜欢这节课的学生可能会对以下相关行业产生兴趣:
- 商业与金融(创业学)
- 制造与工程(工程预科)
教师支持
学生将会:
- 运用设计流程解决实际问题
www.moe.gov.cn/srcsite/A26/s8001/201801/t20180115_324647.html
高中信息技术课程标准
移动应用设计模块
2.3 在具体的移动应用设计实践中,了解移动应用的基本架构,理解基于图形化开发工具进行移动应用设计与开发的基本方法,能利用模拟器测试移动应用程序(APP)。
2.4 了解移动终端的常用传感器种类及功能,理解其数据采集方式,能在移动应用设计中使用多种数据输入方式。
算法与计算模块
1.7 掌握一种程序设计语言的基本知识,使用程序设计语言实现简单算法。通过解决实际问题,体验程序设计的基本流程,感受算法的效率,掌握程序调试与运行的方法。

